The Planner: list, board, and calendar views
How to see and manage all your content across its lifecycle in the Planner, switch between list, board, and calendar views, filter, add content manually, and subscribe to your content calendar.
Written By Ally | Team Assistant
Last updated 6 days ago
The Planner is where all your content lives in one place, from first idea to published post. Open it from Planner in the left navigation. Every piece moves through the same five stages, shown by colour throughout the Planner: Idea (grey), Draft (blue), Ready (amber), Scheduled (purple), and Published (green). See The Content editor for what each stage means.
Top controls (all three views)
List / Board / Calendar: switch between the three views.
Filter: filter by View: All, Favorites, or Archived.
Add content: create a new content piece manually (see below).
List view
A two-panel layout. The left panel lists every content piece with its status dot and title; click one to open it in the full editor on the right. That editor is the same one agents create in: title, version selector, labels, the status pipeline, media, rich-text editing, character and word count, and Schedule. At the top of the editor, Open conversation jumps back to the chat that produced the piece.
Board view
A Kanban board with one column per stage: Idea, Draft, Ready, Scheduled, Published, each showing a count. Cards show the title and status dot, and Scheduled cards also show their scheduled date. Drag a card between columns to move it through the statuses, or click a card to open it.
Calendar view
A calendar of your scheduled and published content, placed on the day it goes out. Controls: previous and next arrows to move through time, the current period label, and a granularity dropdown offering Day, Week, or Month. A Schedule button and a calendar-feed icon sit at the top-right.
Subscribe to your content calendar
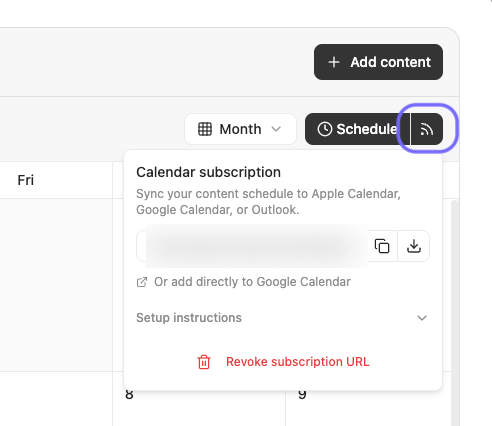
The little feed icon next to Schedule opens Calendar subscription, which syncs your Whaaat AI content schedule into Apple Calendar, Google Calendar, or Outlook. Your planned and published posts then appear in your everyday calendar. You get a private subscription URL and can:
Copy the URL and add it to your calendar app as a subscribed calendar.
Download an .ics file for a one-time import.
Or add directly to Google Calendar with one click.
Expand Setup instructions for step-by-step help per calendar app.
Use Revoke subscription URL to invalidate the current link and generate a new one.
Because it is a live subscription rather than a one-time export, your calendar updates automatically as your schedule changes.
Add content (manual)
Click Add content to create a piece yourself rather than through an agent. The dialogue has a Content title, an Add label option, the status pipeline (manual content starts as Idea), a Media area, and the rich-text editor. Finish with Schedule and create to create and schedule in one step, or use its dropdown for Create without scheduling to just add it to the Planner.
Common issues
The calendar looks empty: content only appears on its scheduled or published date, so navigate to the right time frame, or use List or Board to see everything at once.
You cannot find a piece: it may be archived or filtered out. Check the Filter (All / Favorites / Archived).
You want to change a stage fast: in Board view, drag the card to another column.
Tips
Board view is best for seeing your pipeline at a glance, Calendar view for timing, and List view for editing.
Move approved pieces to Ready so they stand out before scheduling.
Subscribe to your content calendar once, and your whole publishing schedule shows up in Apple Calendar, Google Calendar, or Outlook, updating on its own. Keep the subscription URL private, since anyone with it can see your schedule, and use Revoke subscription URL if it ever leaks.
Related articles
The Content editor · Working with agents · Publish or schedule a post